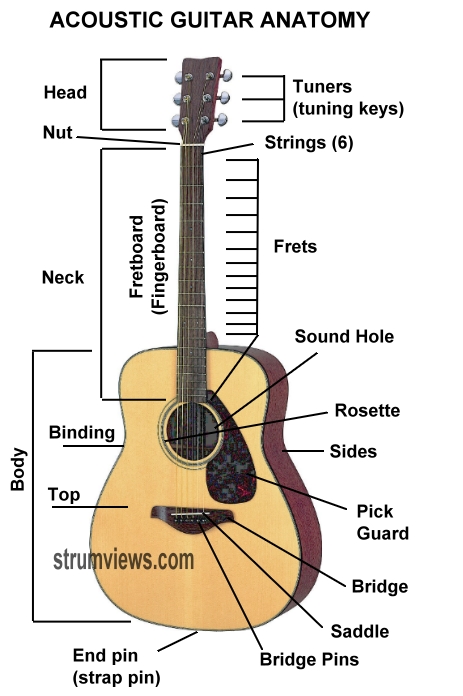
The neck region or neck:
Now find the neck region on the guitar. You'll notice it has several little bars across it, with wood spaced in between on the “fingerboard”. Those spaces are called frets (but don't fret – you'll memorize these the more you practice and it will become second nature to you!). The neck has the fingerboard just under the strings. If you are a right handed player, your left hand and fingers usually press on different strings and different frets to make chords or notes. If you are left-handed, the opposite is true (and you would also need a left-handed guitar!) This diagram is of a right-handed guitar.
The body region or body:
Next, find the body region of the guitar. On the picture, it's the widest part at the bottom. The fingerboard and some of the frets overlap the body just above the sound hole. The sound hole actually collects the sound from the vibration of the strings, and reverberates the sound while the body of the guitar vibrates to amplify the sound of the strings. Without the body and the sound hole, you would have a difficult time hearing the strings when they are plucked or strummed.
The top of the guitar (not the top of the picture – but in the body region) is the surface of the body with the sound hole and is made of a type of spruce wood in this picture. It is responsible for picking up most of the vibration from the strings and amplifying the sound through the top (face) and the body.
Attached to the top (surface) of the body are the pick guard, bridge, rosette and bindings. The pick guard does just that. It guards the top of the guitar from getting scratched and worn by all of the strumming. The bridge holds the bridge pins, and is securely glued to the top (there's a lot of tension on those strings). The strings go over the saddle (seated in the bridge), through holes where the bridge pins keep the strings anchored so you can tune them at the head. The rosette is a round decoration that surrounds the sound-hole. Some are made of plastic, some are inlayed (decorated) with mother of pearl or other precious materials. The bindings help keep the top and the sides of the guitar glued together and protects the edges of the guitar body while also giving it a nice design. The end pin of the guitar is a place where you can attach one end of a guitar strap if you decide to play while standing. It is also a great place to plug in a cord if the guitar has a “pickup” installed. A pickup is simply an electronic device that allows the acoustic guitar to be plugged into an amplifier or speaker.
Now, in order to learn to play a guitar, you won't have to memorize all of these terms. It helps to know your guitar to be able to understand how it works, and to be able to communicate with others about it. For the most part, while learning how to play, you will need to focus on learning these few terms:
Head
Neck
Body
Fret
Fret board (or fingerboard)
tuners (or tuning keys)
Now that you have become familiar with the acoustic guitar, you are ready to begin your next lesson: How to hold and strum the guitar.
Bio: This lesson provided by Aaron Schulman. He has an Ohio Web Design company and has enjoyed playing and teaching the guitar for over 15 years. Before buying your first guitar, go to strumviews.com and read his reviews to find the best beginner acoustic guitar.
The Making of the Constitution and the Foundation of the U.S. Legal System and Government
Part 1 Part 2
Part 3
Safety Tips for Fun Family Travel
|